
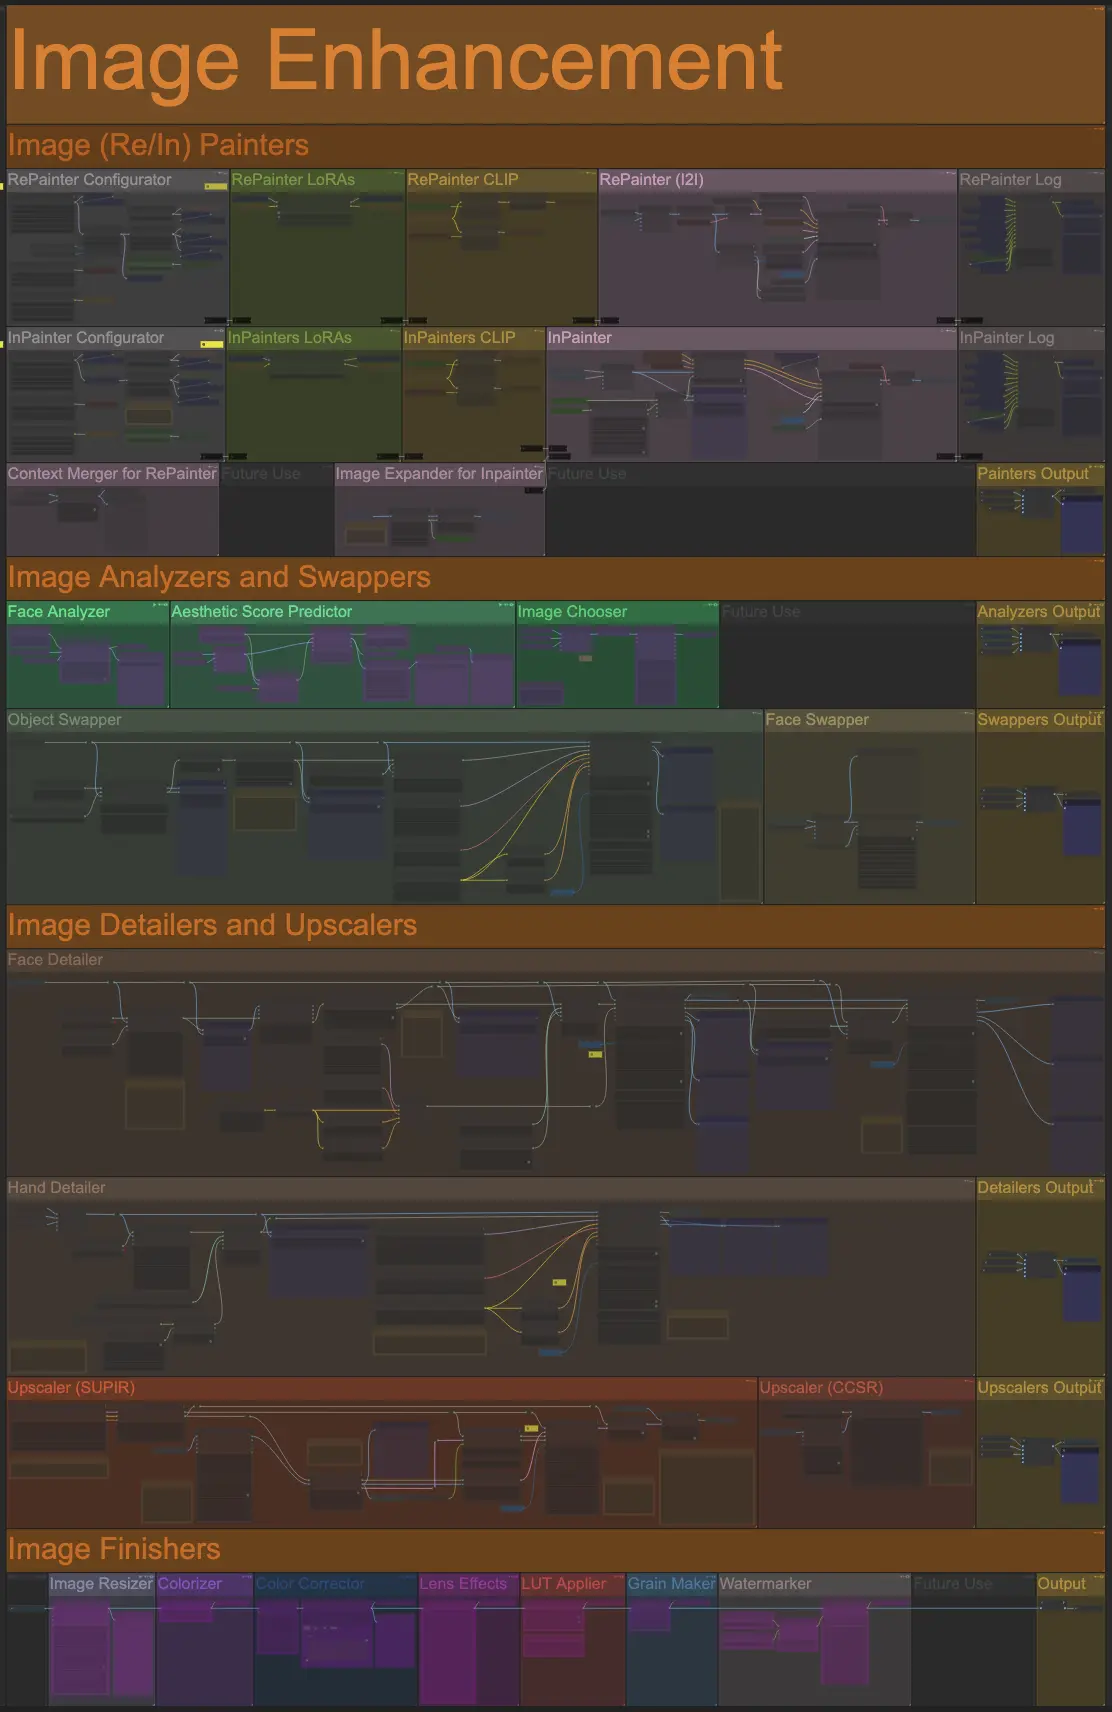
Open Creative Studio’s Image Enhancement pipeline orchestrates dozens of powerful AI models to improve, modify, and finish your images in a fully automated way.
The Image Enhancement pipeline is organized in the following subsections:
Image (Re/In) Painters
Open Creative Studio offers the capability to repaint, inpaint, or outpaint a source image loaded via the Image Uploader function, or an image generated via any of the image generation pipelines.
Accordingly, this subsection of the Image Enhancement section is split into two pipelines:
- RePainter (I2I)
- InPainter (also responsible for outpainting)
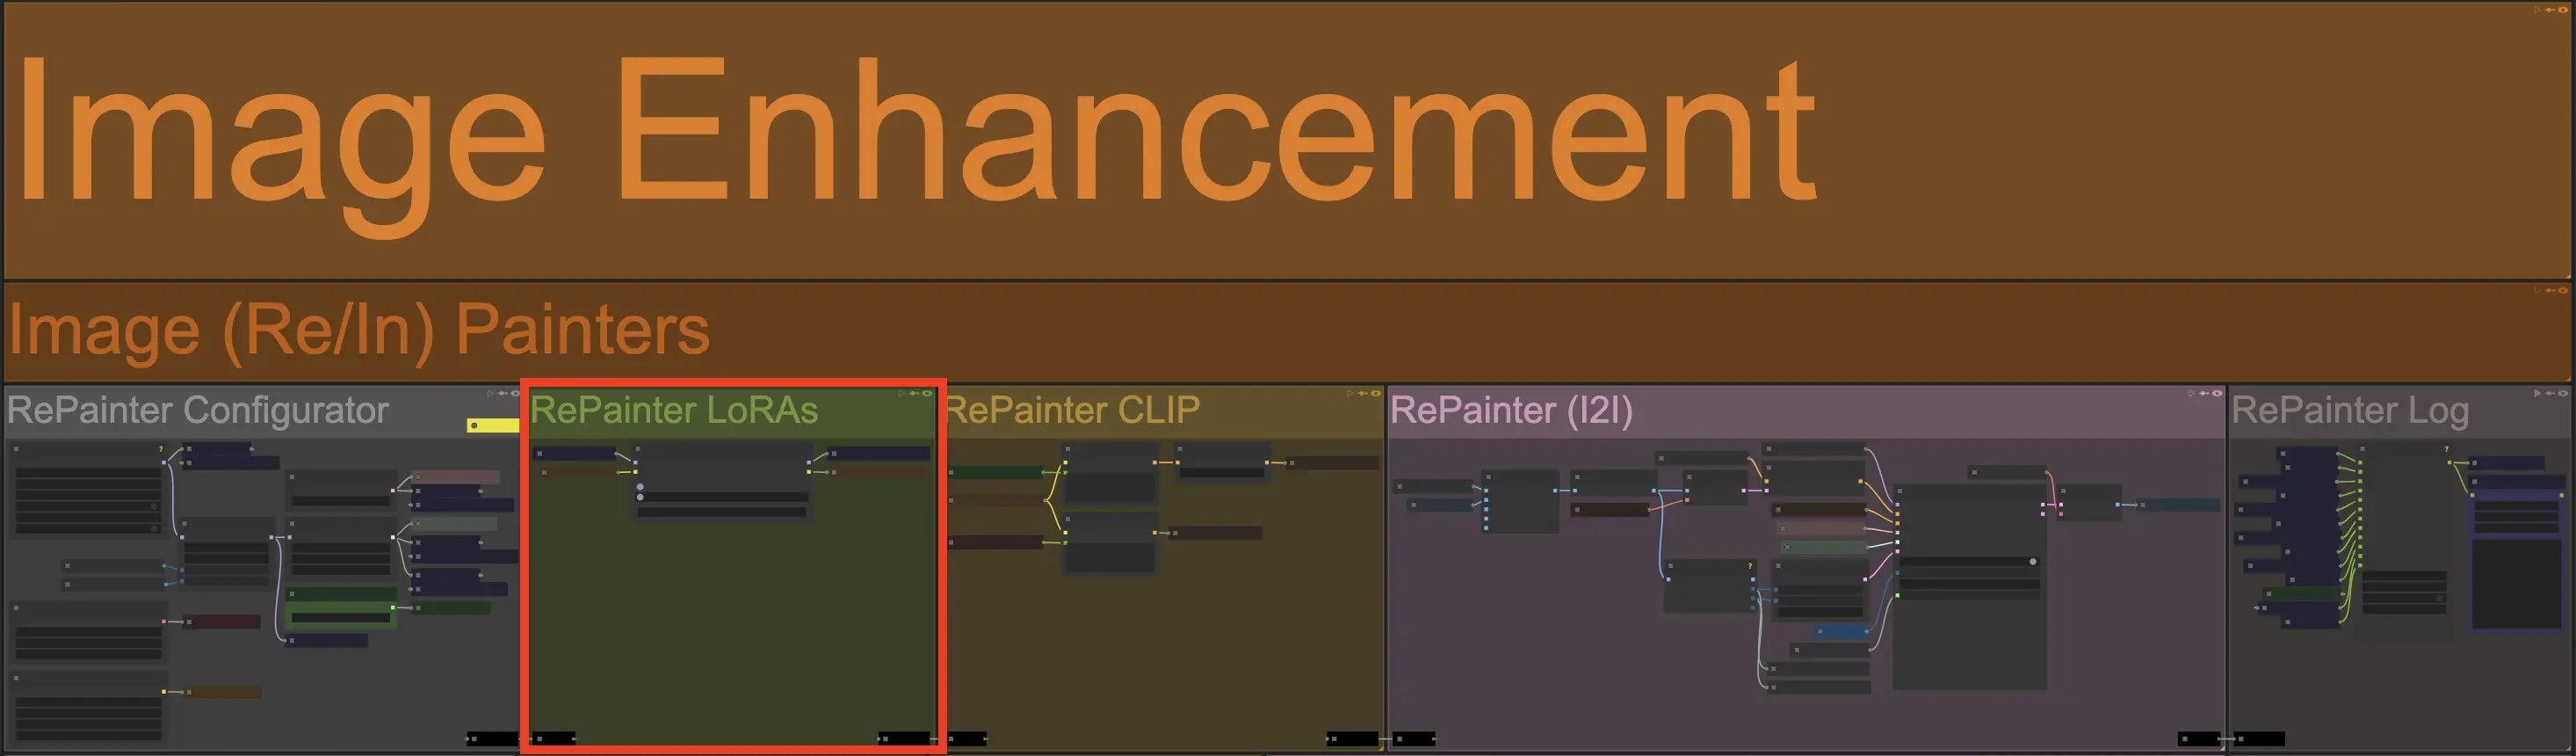
Similar to the image generation pipelines in the Image Generation section of Open Creative Studio, the RePainter (I2I) and InPainter pipelines include multiple functions.
Inside the RePainter Configurator and the InPainter Configurator functions, you can modify parameters like the model being used, the diffusion steps, the type of sampler and scheduler, and much more.
NOTICE: This type of repainting/inpainting is different from the one automatically performed by image manipulator functions like Hand Detailer, Face Detailer, Object Swapper, and Face Swapper.
RePainter (I2I)
The RePainter (I2I) pipeline allows you to inpaint the entire source image chosen via the Image Uploader function, performing an operation known as img2img or I2I.
The RePainter (I2I) pipeline leverages the versatility of the FLUX.1 Dev Kontext model to enable various use cases. For example:
- Recoloring
- Old image restoration
- Reskinning
Depending on the user prompt you will write or choose in the Prompt for Repainter (I2I) function, inside the Prompts section of Open Creative Studio, the model will perform the desired operation.
The RePainter (I2I) function can also be used to add details to a source image without altering its subject or scene.
To do so, you might want to activate a LoRA focused on detail enhancement as part of the repainting process.
Context Merger for RePainter
The Context Merger for RePainter is an auxiliary function that must be used together with the RePainter (I2) function.
The Context Merger for RePainter function will take into account the image you set in the 1st Reference Image function and, depending on your user prompt, enable additional use cases:
- Character consistency
- Context merging
For example, you can generate a new image that retains a character’s features in the reference image, even when the latter has not been generated inside Open Creative Studio:
Or, you can generate a new image that merges two characters from the source image and the first reference image:

InPainter
The InPainter pipeline allows you to inpaint a specific area of the source image chosen via the Image Uploader function.
The InPainter pipeline leverages the FLUX.1 Dev Fill model, trained specifically for inpainting tasks.
The inpainting mask must be defined manually in the Image Uploader function, via the ComfyUI Mask Editor.

NOTICE: With the right user prompt, the RePainter (I2I) pipeline can perform inpainting, too, but it’s much harder to blend the inpainted elements with the rest of the source image without the additional use of a LoRA.
On the other hand, the InPainter function requires extreme care in setting the attention mask to avoid altering features in the source image that you don’t want to alter (like a nose).

Image Expander for InPainter
The Image Expander for InPainter is an auxiliary function that must be used together with the InPainter function.
This function allows you to define an outer mask to extend the source image in one or more directions.
The outpainting mask must be defined manually in the Image Expander function by configuring the number of pixels to add to the image in every direction.

NOTICE: With the right user prompt and the addition of the appropriate LoRA, the RePainter (I2I) pipeline can perform outpainting, too.
Image Analyzers
Open Creative Studio is capable of generating images at an industrial scale. To help you choose the best images among hundreds or thousands, you can count on up to three Image Analyzers.
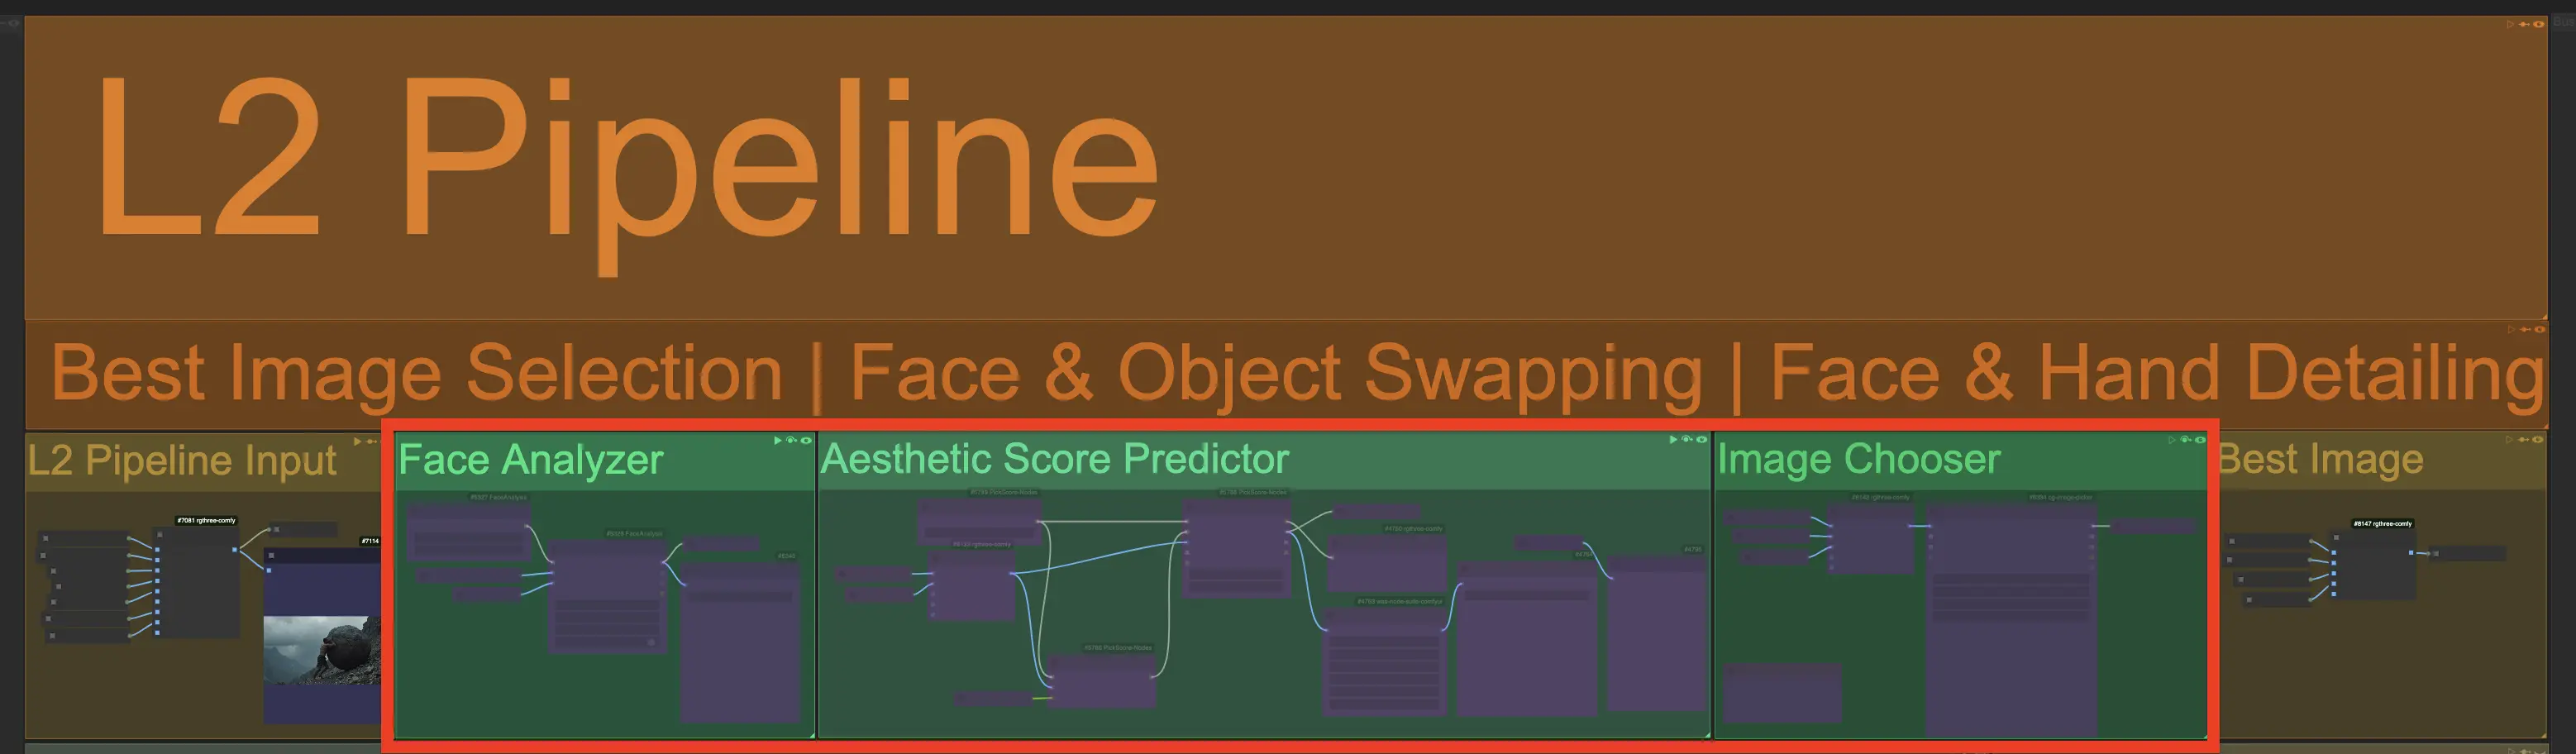
Face Analyzer
The Face Analyzer function allows you to evaluate a batch of generated images and automatically choose the ones that present facial landmarks very similar to the ones in the image you set inside the 1st Reference Image function.
Aesthetic Score Predictor
The Aesthetic Score Predictor function is capable of rearranging a list or batch of generated images based on their aesthetic score.
The aesthetic score is calculated starting from the prompt you have defined in the Prompt for Score Predictor function inside the Prompts section of Open Creative Studio.
The Aesthetic Score Predictor function can be reconfigured to automatically exclude images below a certain aesthetic score.
This approach is particularly useful when used in conjunction with the Image Chooser function (see below) to automatically filter a number a large number of generated images.
WARNING: The Aesthetic Score Predictor function is not perfect and you might disagree with the score assigned to the images.
In our tests, we found that the AI model used by this function does a reasonable good job at identifying the top two images in a batch.
Image Chooser
When you generate a list of images with any image generation pipeline, or when you upload a list of images via the Image Uploader function, you might want to pause the execution of Open Creative Studio and choose a specific image from the list before processing it any further in the Image Enhancement pipeline.
The Image Chooser function allows you to do that.
When enabled, the function will interrupt Open Creative Studio’s execution and will generate a full-screen pop-up where you’ll be able to choose what images to approve for further processing.

A time-out feature will guarantee that, if left unattended, ComfyUI will resume Open Creative Studio execution by automatically selecting:
- None of the images
- All the images
- Only the first image
- Only the last image

Image Swappers
Image Swapper functions perform a fully automated type of inpainting using very different models and techniques compared to the ones used by the RePainter (I2I) and InPainter pipelines.
For example, some of these models used by these functions are specialized in computer vision and are designed to identify the portion of the source image containing the object you describe in your prompt.
Object Swapper
The Object Swapper function is capable of identifying a wide range of objects and features in the source image based on your description.
Once an object/feature has been identified, it will be modified according to the prompt you defined in the Open Swapper Prompt function, in the Prompts section of Open Creative Studio.
Despite its name, the Object Swapper function can also be used to modify the physical aspect of the subjects in the source image.
NOTICE: The Object Swapper function leverages a dedicated SDXL ControlNet Tile model and a dedicated SDXL fine-tuned variant.
The SDXL ControlNet Tile model has been choses as it performs better than both SD15 ControlNet Tile and SD3 ControlNet Tile models.
Face Swapper
The Face Swapper function identifies the face of one or more subjects in the source image and swaps it with a face of your choice.
You can set the source image in the Image Upload function and the face that will be placed inside it with the 1st Reference Image function.
If your source image has multiple faces, you can target the desired one via an index value.
Image Detailers
Face Detailer
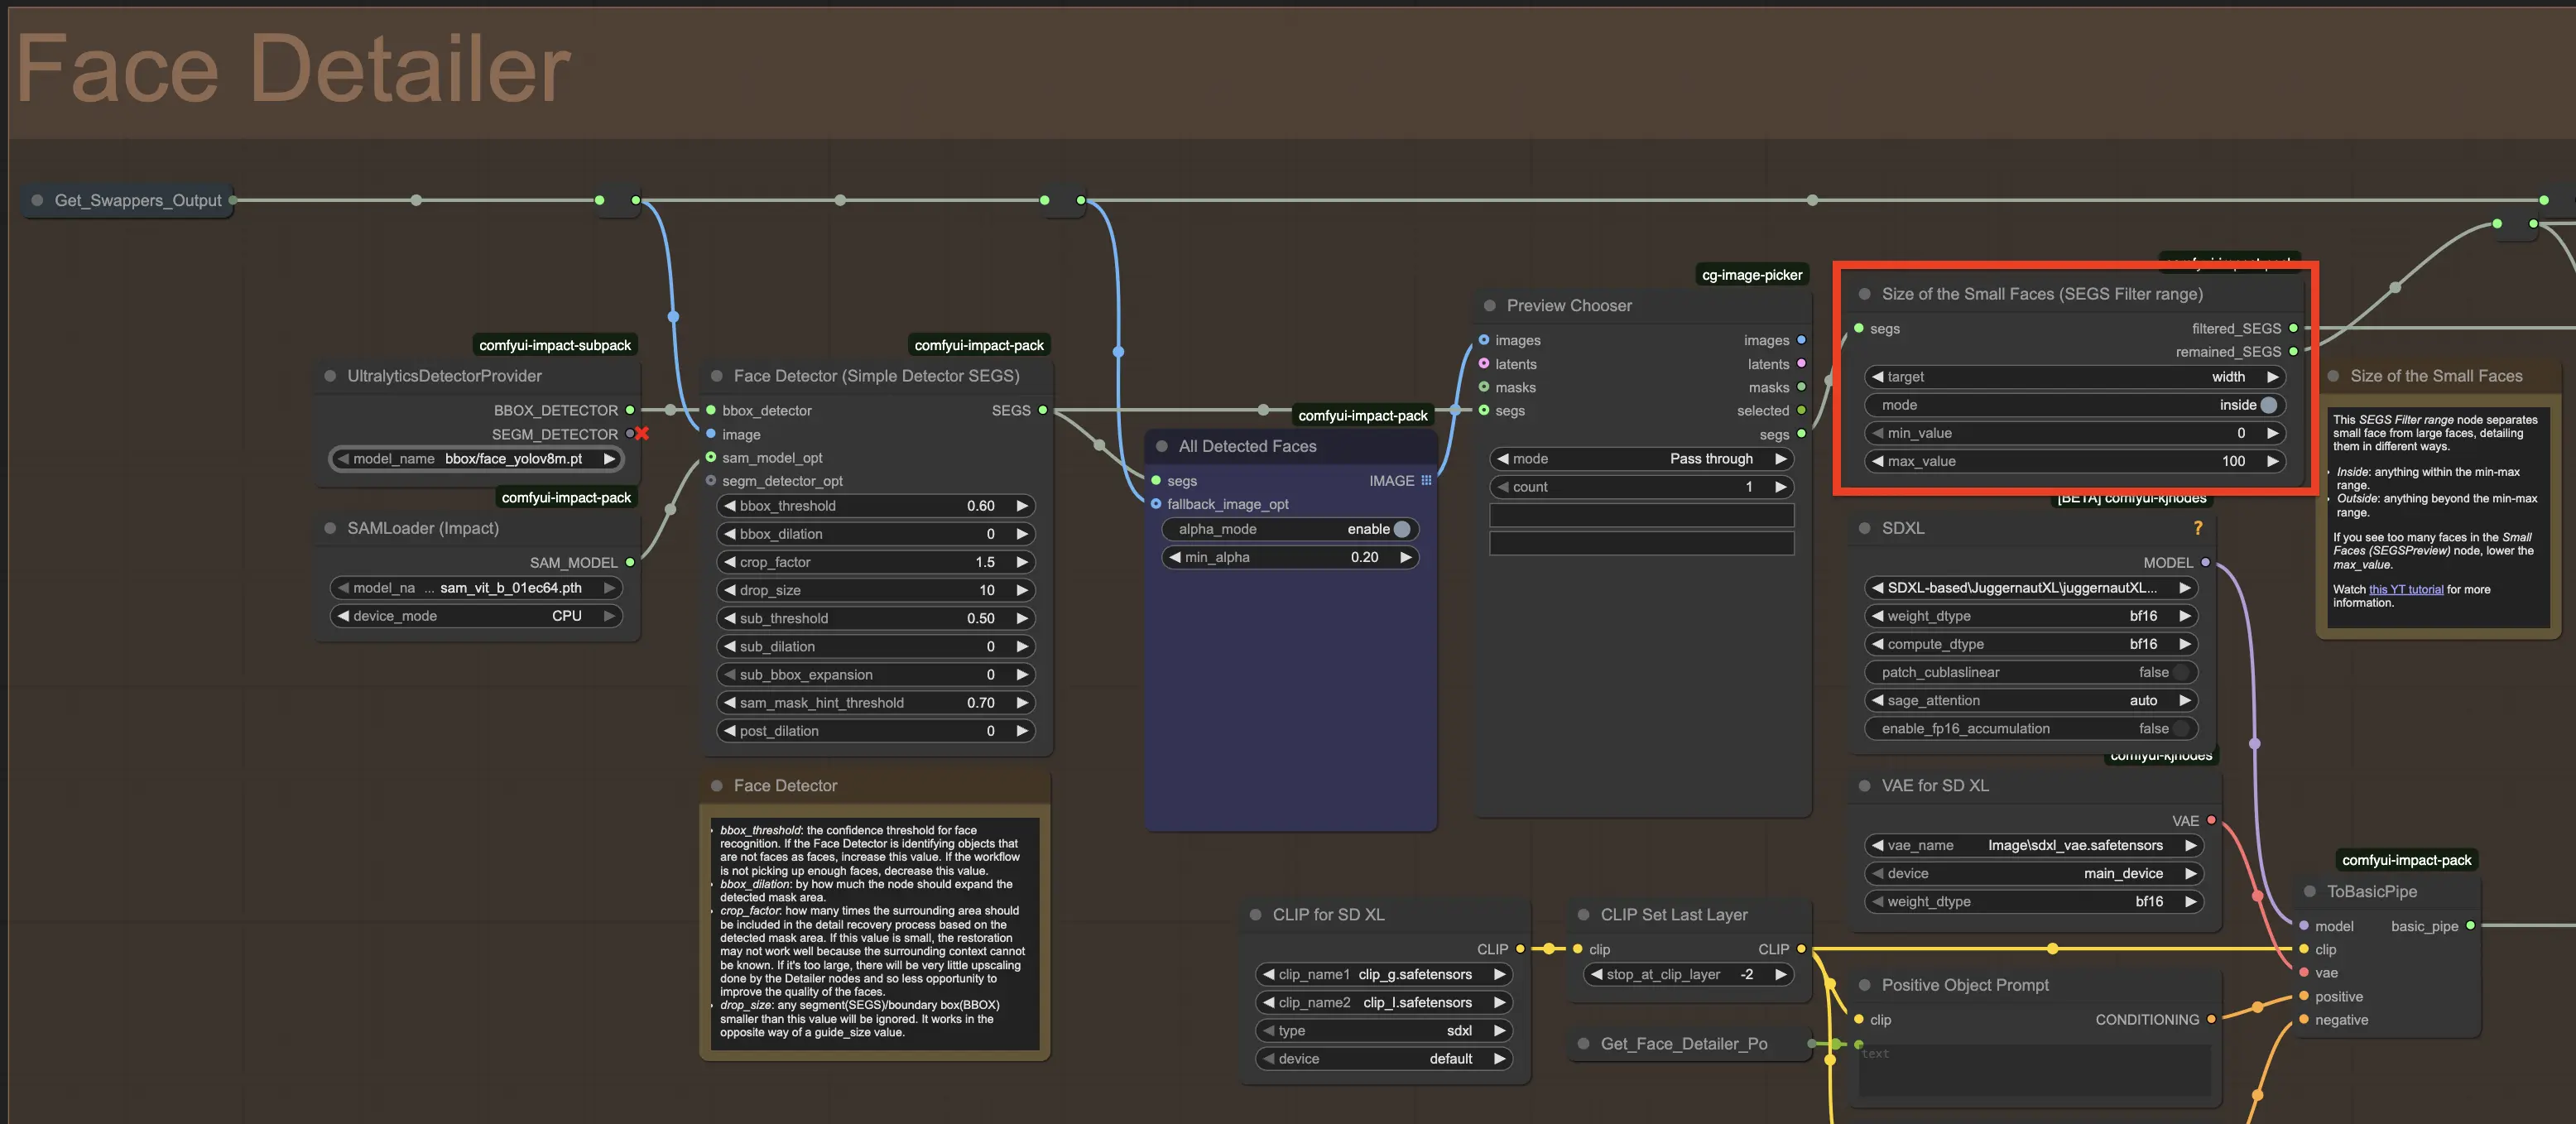
The Face Detailer function helps you improve the aesthetics of one or more faces in a source image set in the Image Uploader function, or in an image generated with any Open Creative Studio image generation pipeline.
Uniquely, the Face Detailer function automatically identifies and distinguishes between small and large faces. This is because large faces require a very different inpainting configuration than small faces.
You can change the threshold defining what face is considered large or small in the parameters of the function:
The Face Detailer function generates an intermediate image after processing small faces and another after processing large faces.
These intermediate images can be saved if you enable the Intermediate Image Saver function in the Control Panel.

NOTICE: The Face Detailer function uses a dedicated SDXL ControlNet Tile model and a dedicated SDXL diffusion model. Despite that, it can detail faces in any source image set via the Image Uploader function, as well as any image generated with the Open Creative Studio image generation pipelines.
The SDXL ControlNet Tile model has been chosen because it performs better than both SD1.5 ControlNet Tile and SD3 ControlNet Tile models.
Hand Detailer
The Hand Detailer function helps you improve the anatomy of any hand visible in the source image set in the Image Uploader function, or in an image generated with any Open Creative Studio image generation pipeline.
To do its job, the Hand Detailer function first tries to identify the hand in any source image, and then it automatically repaints it.
The hand identification process depends on the specialized Mesh Graphormer Depth preprocessor.
WARNING: The Mesh Graphormer Depth preprocessor occasionally struggles to identify hands in non-photographic source images.
Because of that, you have the option to switch to a DW preprocessor.

NOTICE: The Hand Detailer function leverages a specialized SD1.5 Inpaint Depth Hand ControlNet model.
Despite that, it can detail hands in any source image set via the Image Uploader function, as well as any image generated with the Open Creative Studio image generation pipelines.The SD1.5 Inpaint Depth Hand model has been chosen because no variant based on Stable Diffusion XL, Stable Diffusion 3, or FLUX exist.
Image Upscalers
Open Creative Studio features two independent upscaling functions:
While these upscaling functions internally use specific versions of Stable Diffusion, they can be used to upscale any source image set via the Image Uploader function, as well as any image generated with the Open Creative Studio image generation pipelines.
Upscaler (SUPIR)
The Upscaler (SUPIR) function leverages an internal Stable Diffusion XL model to generate exceptional upscaling results, on par or superior to the ones you can obtain with commercial solutions like Magnific AI or Topaz Gigapixel.
The Upscaler (SUPIR) function is very versatile and, depending on its configuration, it allows you to achieve high-fidelity upscaling (where all details of the original image are kept intact) or creative upscaling (where the details of the original image can be altered with various degrees of freedom).
The Upscaler (SUPIR) function is preconfigured for high-fidelity upscaling, but you can perform a more creative upscaling by lowering the strength of the control_scale_end parameter.

WARNING: Configuring the Upscaler (SUPIR) function is extremely complex and the underlying model is very sensitive to prompt changes.
For this reason, you should not change any parameter unless you are sure about what you are doing, and you should only use the prompts that have been preconfigured for you in the Prompt for Upscaler function, inside the Prompts section of Open Creative Studio.
Upscaler (CCSR)
The Upscaler (CCSR) function leverages an internal Stable Diffusion 2.1 model to achieve exceptional upscaling results in some edge cases where the Upscaler (SUPIR) function struggles. For example, when the source image features an intricate pattern that must be preserved.
The Upscaler (CCSR) function is marginally easier to configure than the Upscaler (SUPIR) function, and it can reach very high upscale factors at a fraction of the memory requirements.
WARNING: The Upscaler (CCSR) function behaves differently depending on the upscaling factor you are trying to achive.
The ccsr_tiled_mixdiff method and a steps value of 3 is recommended for upscaling up to 4x.
The ccsr_tiled_vae_gaussian_weights method and a steps value of 20 is recommended for upscaling to 6x.
The function is preconfigured to generate optimal results for 4x upscaling.
Image Finishers
The very last steps of the Image Enhancement pipeline are performed by a series of Image Finisher functions:
Image Resizer
The Image Resizer function allows you to resize a source image, or an image generated with any Open Creative Studio image generation pipeline, via traditional interpolation methods.
You can set any of the following resizing targets:
- Width
- Height
- Multiplier
- Megapixel resolution
- Aspect ratio (from width)
- Aspect ratio (from height)
NOTICE: While the Image Resizer function is not preconfigured to do so, it also allows you to define a custom upscaling method, by leveraging one of the many upscaling models available here.
This would add a third upscaling option to Open Creative Studio, ideal for specific use cases where a highly specialized upscaling model is a better fit.
Colorizer
The Colorizer function leverages a model trained specifically to colorize monochrome images. You can use it on a source image set via the Image Uploader function.
Its performance differs from that of the Repainter (I2I) function, and you are recommended to try both to understand their differences.
Color Corrector
The Color Corrector function offers two approaches to color correction:
- A value-based approach, allowing you to adjust the gamma, contrast, exposure, offset, hue, saturation, etc.
- A curve-based approach, allowing you to adjust the red, blue, green, and luma curves.
The Color Corrector function also allows you to use several curve presets:

If you want to add your curve presets, place your curve files in the following folder:
/ComfyUI/custom_nodes/ComfyUI-Olm-CurveEditor/curve_presets
and restart ComfyUI.
Lens Effects
The Lens Effects function gives you the capability to simulate a wide range of lens effects for your source image:
- Bulge or squeeze distortion
- Chromatica aberration
- Vignette
LUT Applier
The LUT Applier function allows you to apply a color grading Look-Up Table (LUT) file to your source image.
If you want to add your LUTs, place your LUT files (with the .cube extension) in the following folder:
/ComfyUI/custom_nodes/ComfyUI_essentials/luts
and restart ComfyUI.
Grain Maker
The Grain Maker function allows you to add grain and/or a vignette effect to the source image.
The grain can be controlled in terms of intensity, scale, and temperature.
Watermarker
The Watermarker function adds a text of your choice to the source image, in the position of your choice.
If you want to add your fonts, place them (wth the .ttf extension) in the following folder:
/ComfyUI/custom_nodes/ComfyUI_Comfyroll_CustomNodes/fonts
and restart ComfyUI.

