
Open Creative Studio is currently available in the following versions:
| 13.0 | 14.0 Early Access 4 | |
|---|---|---|
| Release Date | Aug 26, 2025 | Feb 13, 2026 |
| Focus | Stability | Newest AI models and bleeding-edge features |
| Access | Free for everyone | Early Access Program members |
| Documentation | Link | No |
| Support | No | Discord |
| New Features | What’s New? | What’s New? |
| Next Release | In 4-6 months | |
| Download | Link | Link |
To run Open Creative Studio 13.0, you’ll have to download and install:
- ComfyUI and ComfyUI Manager
- The required custom nodes
- The required AI models
- Open Creative Studio
- (optional) Open Creative Studio Web Front End
- (optional) An SSL certificate
1. Install ComfyUI and ComfyUI Manager
Download and install ComfyUI and ComfyUI Manager in a new folder to create a clean, new Python virtual environment.
Open Creative Studio 13.0 is confirmed to work with the following versions of Python, Pytorch, and ComfyUI components:
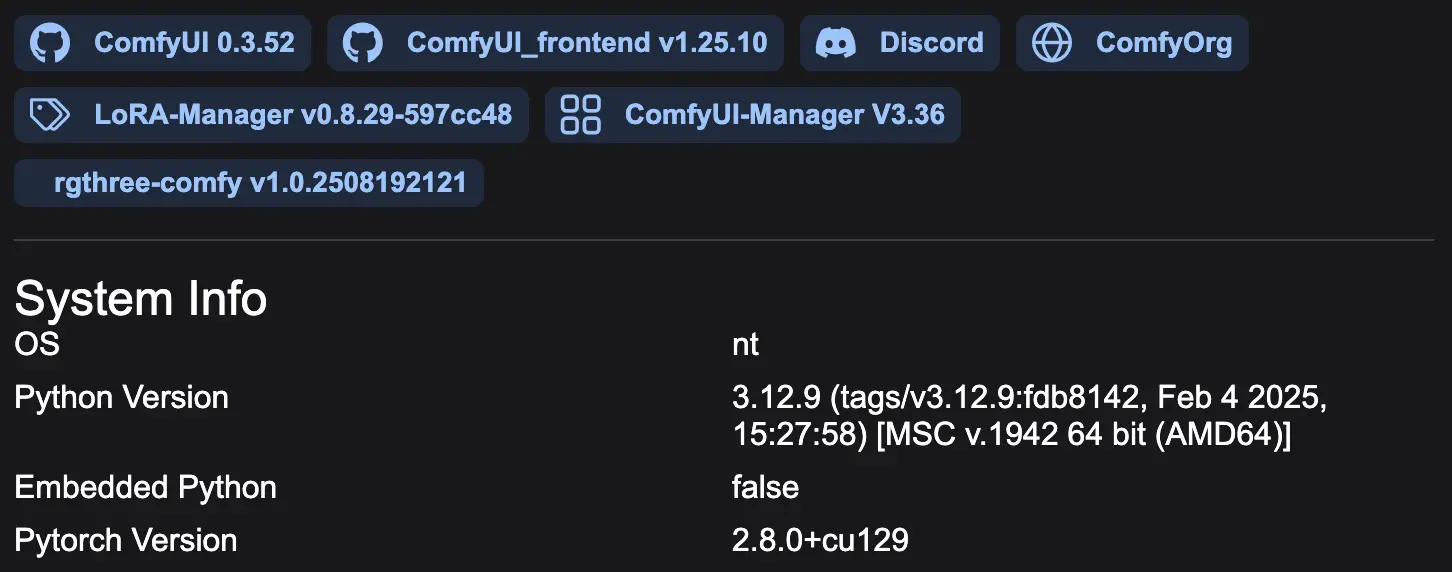
WARNING: If you have a different version of Python, Pytorch, or ComfyUI components (ComfyUI engine, frontend, and manager), Open Creative Studio may still run, but its functions may not work as intended.
After installing ComfyUI, launch it to verify that it works, and then shut it down.
2. Install the Required Custom Nodes
While ComfyUI is not running, execute the following installation steps:
- Download the OCS Nodes Snapshot for ComfyUI Manager.
- Move/copy the snapshot to this folder:
/ComfyUI/user/default/ComfyUI-Manager/snapshots/ - Restart ComfyUI.
- Open ComfyUI Manager and then the Snapshot Manager.
- Restore the OCS Nodes Snapshot.
- Restart ComfyUI and wait for all custom nodes to be installed. You can monitor this process by looking at the terminal.
If some of the custom nodes failed to install, you’ll see one or more IMPORT FAILED messages in the terminal.
If that’s your case, check the FAQ page.
3. Install the Required AI Models
Many nodes used by Open Creative Studio require specific AI models to perform their tasks. While some nodes automatically download the required models, others require you to download them manually.
Every model used by Open Creative Studio can be manually downloaded from here.
You can download the models in two ways:
- Clone the repository with the following command from the root of your drive:
git clone https://huggingface.co/perilli/OCS_Models
Depending on your network, this step might take several hours as you are downloading over 700GB of models. - Manually replicate the folder structure below and then download only the models you need. Your root folder should be called:
OCS_Models.
Once you have downloaded the required AI models, you must modify the ComfyUI extra_model_paths.yaml as follows:
comfyui:
    base_path: [your_drive]\OCS_Models\
    Generation_models: |
        Generation\Image
        Generation\Video
        Generation\Audio
        Upscaling\Image
    checkpoints: |
        Generation\Image
        Generation\Video
        Generation\Audio
        Upscaling\Image
    unet: |
        Generation\Image
        Generation\Video
        Generation\Audio
        Upscaling\Image
    vae: VAE
    text_encoders: Encoding\Text
    clip_vision: Encoding\Image
    loras: |
        Conditioning\Image\LoRAs
        Conditioning\Video\LoRAs
        Conditioning\Audio\LoRAs
    ipadapter: Conditioning\Image\IPAdapter
    style_models: Conditioning\Image\Redux
    controlnet: Conditioning\Image\ControlNet
    upscale_models: Upscaling\Image
    CogVideo: Generation\Video
    cogvideox_loras: Conditioning\Video\LoRAs
    embeddings: Conditioning\Image\Embeddings
    model_patches: Patches
WARNING: If you already have all the AI models necessary to run Open Creative Studio installed in your system, you still need to remap them in each node of the workflow.
This is because the paths configured inside Open Creative Studio don’t necessarily match your paths, and ComfyUI doesn’t automatically reconcile the mismatch.
Additionally, in some cases, if ComfyUI cannot find the AI model that a node requires, it might automatically reassign another model to a certain node. For example, this happens with ControlNet-related nodes.
Most errors encountered by Open Creative Studio users can be solved by replicating the folder structure declared above.
4. Install Open Creative Studio
To launch Open Creative Studio:
- Download the OCS 13.0 workflow file.
- Open the OCS 13.0 workflow file from ComfyUI Manager with CTRL/CMD+O.
5. Install Open Creative Studio Web Front End
Notice: This is an optional step. You don’t need the Web Front End to use Open Creative Studio.
The Open Creative Studio Web Front End is available in two versions:
The Advanced version is available only for research supporters who joined the Early Access program.
Once you have downloaded the version you want, follow this video to install it:
6. Secure ComfyUI with SSL
Notice: This is an optional step. You don’t need an SSL certificate to use Open Creative Studio.
If you want to secure the connection to your ComfyUI instance with SSL, you have multiple options.
Please follow the steps described in the documentation.
